How to Make a Lightroom Collage in 2026 (8 Easy Steps)
Creating a Lightroom Collage may seem daunting for beginners who aren’t experts in using software features. You may feel overwhelmed by combining images into a cohesive design to showcase a theme or tell a story.
The fear of producing a collage that fails to capture the memories or doesn’t evoke any emotional connection is a nightmare for users. Therefore, this tutorial will help you learn how to create a Lightroom collage effortlessly, using the Print Module’s built-in tools rather than any outside software. It’s free once you already have a Lightroom subscription, and it works whether you’re a casual hobbyist or one of the many wedding photographers who deliver collages to clients every week.
TL;DR
How Do You Create a Lightroom Collage in 8 Steps?
Collages make your work creative and become a source of evoking emotions on special events. However, users need to prepare a little bit regarding the photo collage layout and the Lightroom Print Module.
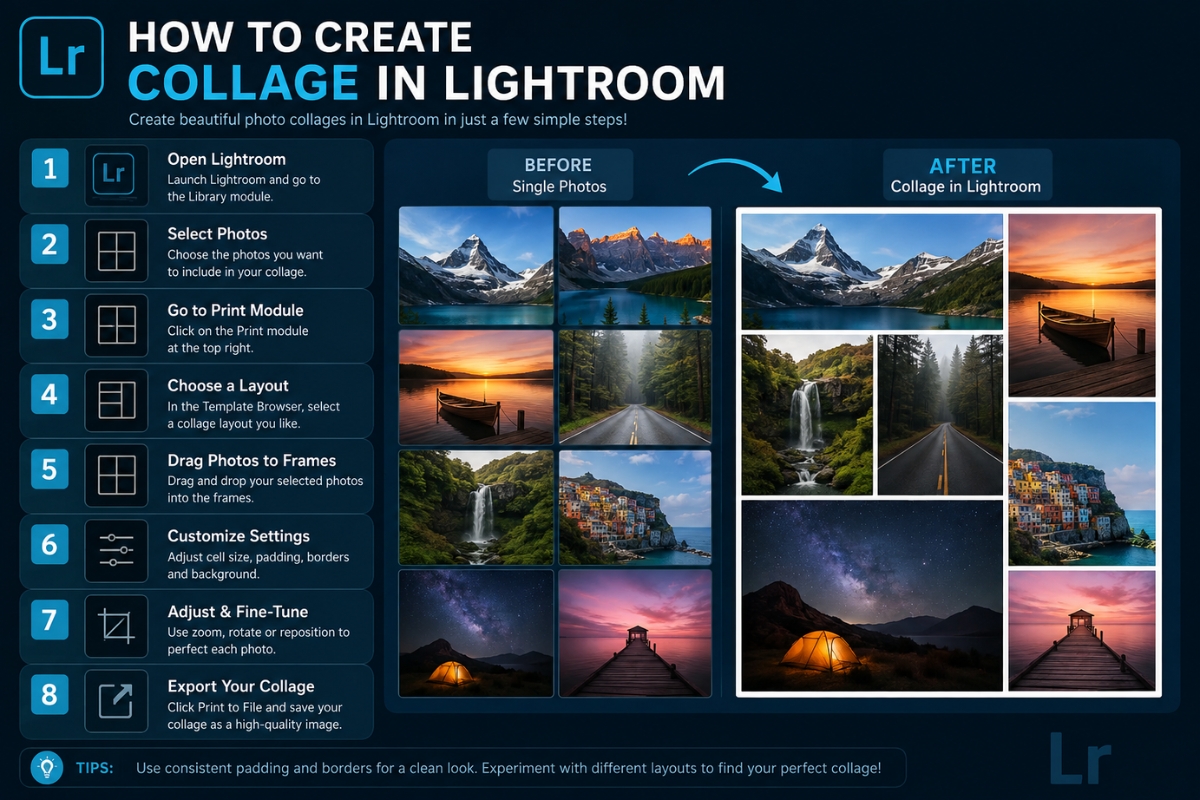
Here is a list of seamless steps that will help you in creating a collage:
- Import Images
- Do Batch Editing
- Lightroom Print Module Navigation
- Settings/Selection of Template Layout
- Customize/Arrange Cell Panel
- Add Images within Cells
- Add a Watermark
- Save and Export
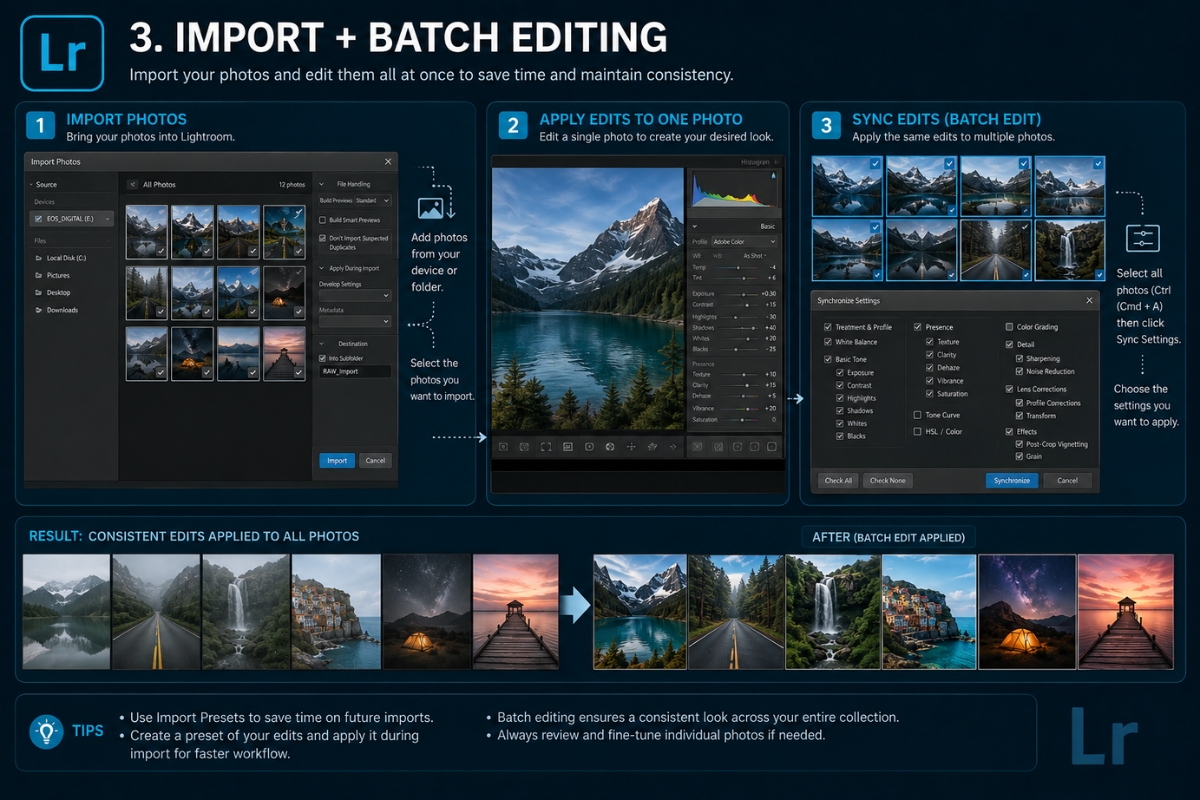
Step 1: Find and Import Images
Before initiating the collage creation process, you have to decide which images you want to import into the collage. For instance, if you want to create a collage about your “School Tour” or a school project, create a folder for the specific images.
Then, import your image folder into Lightroom. Besides, if you want to import images separately, you can do it in the Lightroom library.
Read Also – How to import and install Lightroom Presets?
Step 2: Do Batch Editing on Images
Once you have arranged your images, make your Lightroom photo collage attractive by doing batch editing. A time-saving method for applying the same alteration to several images simultaneously is called batch editing.
Adjust colors, brightness, and contrast on your images, and ensure all of them are high quality. Batch editing also helps make bulk photo editing fast and efficient, which is exactly why wedding photographers rely on it when they’re processing hundreds of images from a single event. If you plan to reuse the same look across every image in the collage, copy your develop settings from one photo and paste them onto the rest instead of editing each one individually.
Lightroom MOD APK offers unlocked features for batch editing, and you can use all of them for free.
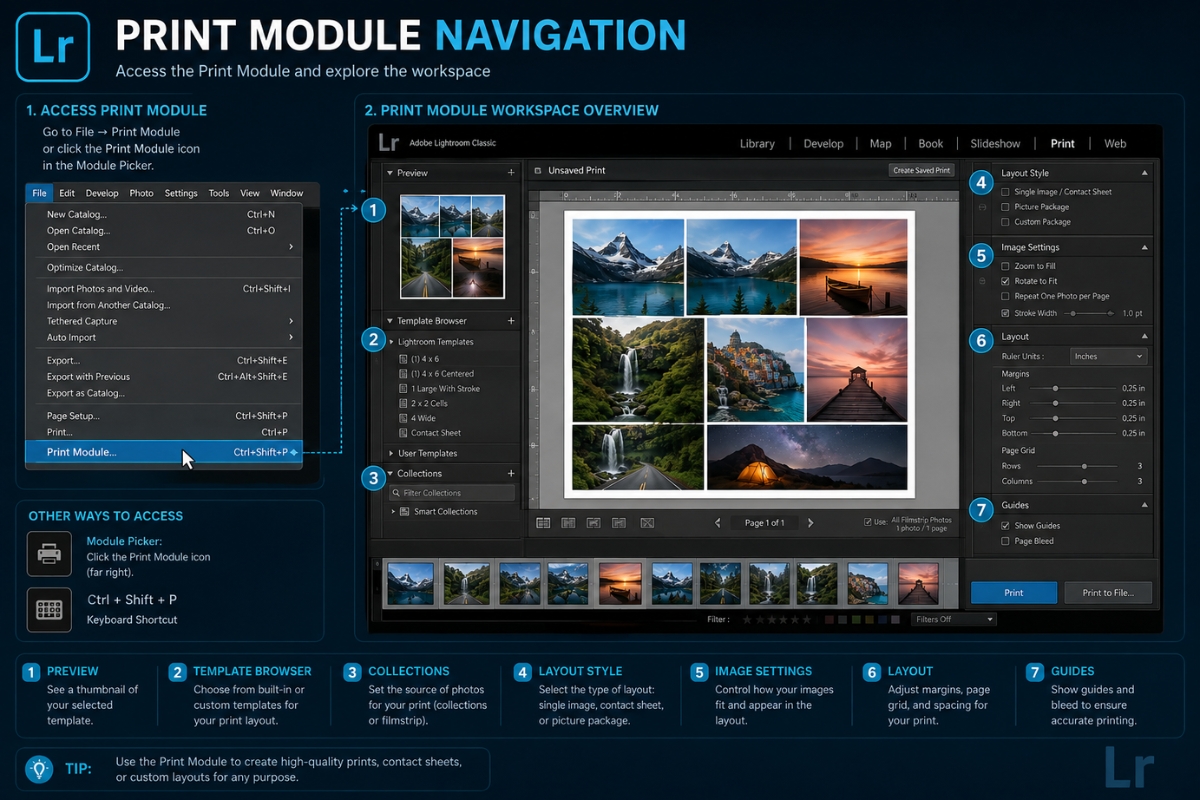
Step 3: Browse the Lightroom Print Module
After editing, it’s time to go to the Lightroom Print Module. Tap on the File tab, then select Print Module, which is available in the drop-down menu on the right-hand side.
Press Ctrl+Alt+6 on Windows or Cmd+Option+6 on Mac to open the Print Module directly. People frequently wonder if they are limited to using the Print Module for printing purposes only. However, it also helps in creating a collage.
Choose the “Template” tab from the left-hand side of the page to view the numerous ready-made templates, including Contact Sheet grids that work well for a quick collage. These free, built-in templates are usually the best starting point for beginners, but you can make a new template based on your needs or use one of the pre-existing layouts.
Important: For individuals using the Lightroom old versions, creating a collage isn’t so difficult. You can follow the steps you do for the Lightroom Classic.
Step 4: Set the Layout Style in Lightroom
For the built-in templates, you don’t have to adjust proper settings, as Lightroom will do that for you. However, follow the steps below if you have chosen a custom template layout to create a remarkable Lightroom collage.
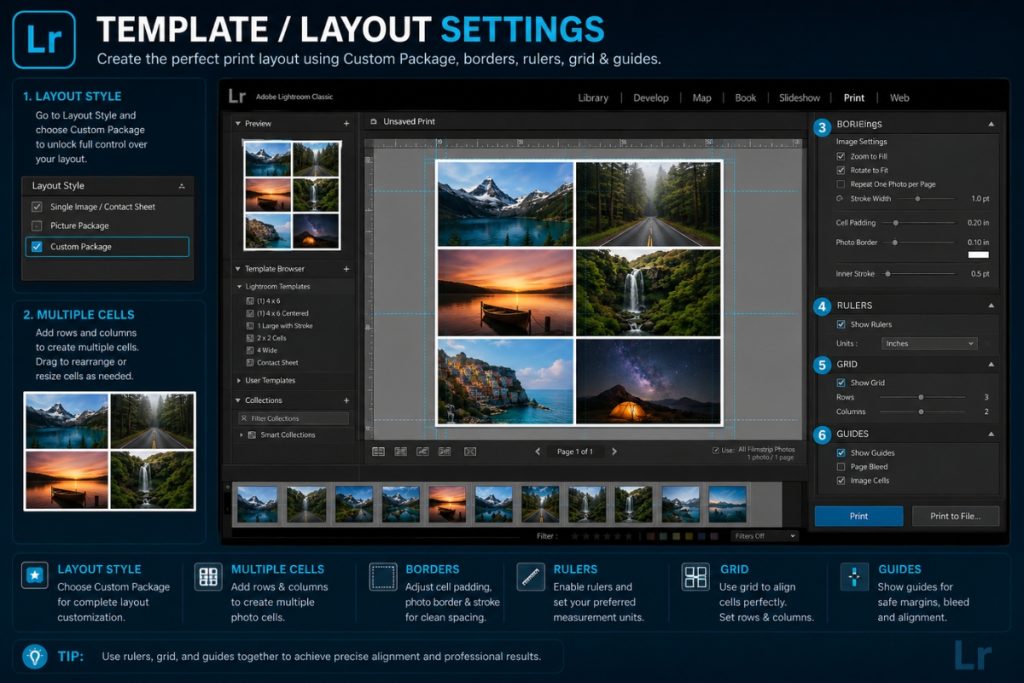
After making some adjustments, select “Create Saved Print” in Lightroom to save this personalized photo collage template. At last, select the collection in which you want to save the template and assign it a name. If you tweak a saved template later, right-click its name in the Template Browser and choose “Update with Current Settings” instead of building a new one from scratch.
Step 5: Customize the Cell Panel and Arrange Cells
To arrange cells, open the cell panel to customize different dimensions. You will see cells appear in the workspace, and now you can arrange them. Sort the cells based on the sizes and dimensions of the photographs.
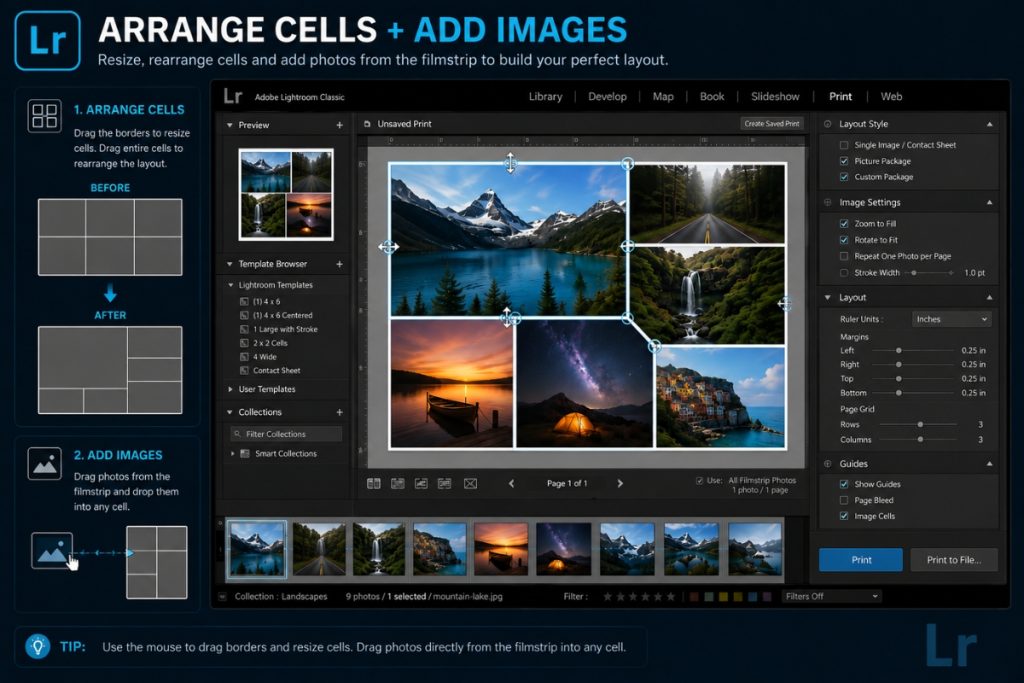
Making your own template is easy using this method, and you can store it for future use. To save this, tap the “+” icon at the top of the template panel, rename it, and click Create.
Note: Learn about the tips and tricks to use Lightroom as beginner.
Step 6: Add Images within the Cells
Once you have customized the cell panel, add the images to the cells according to their sizes and dimensions. Tap the image you see in the filmstrip panel of Lightroom and drag it into the desired cell.
Here, you can rearrange the images in the cells until the composition of your collage looks the way you want. If you have large cells, landscape images tend to look more attractive.
On the contrary, small cells give a stunning look to portrait images. However, the final decision always depends on the needs and requirements of the user or client.
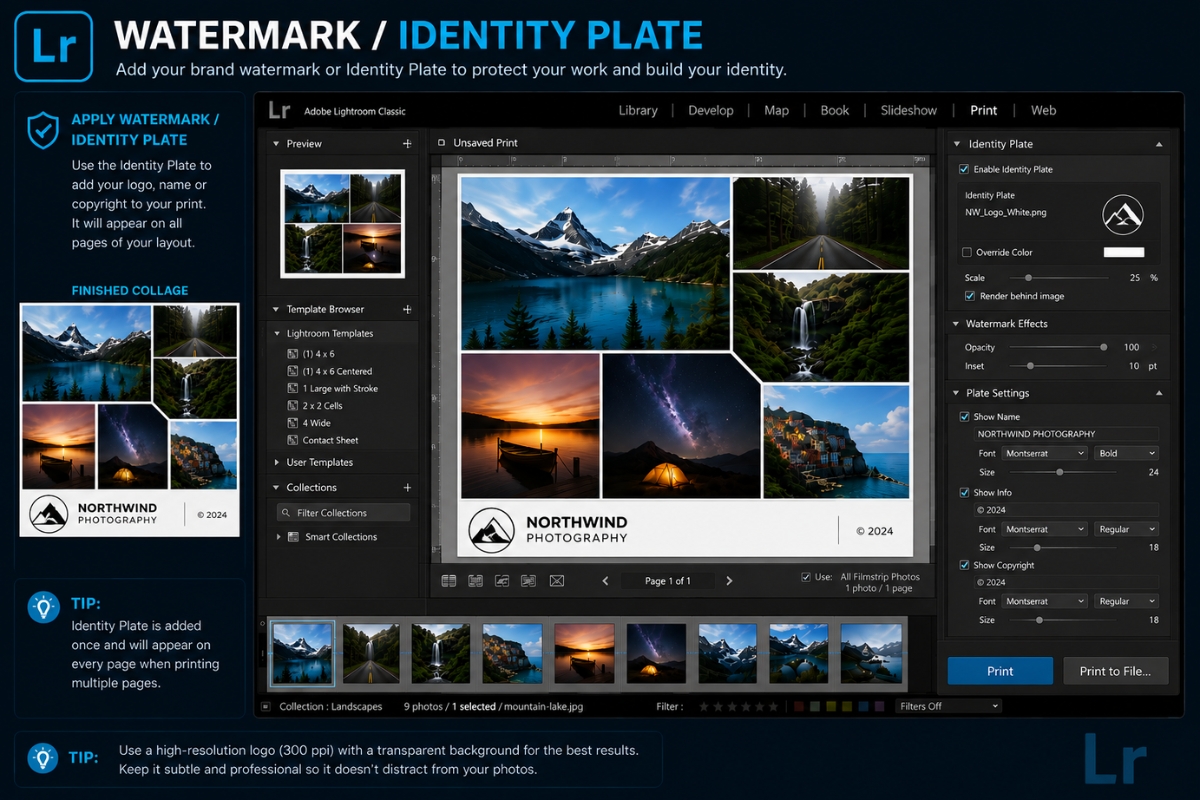
Step 7: Add a Watermark to Your Lightroom Collage
To give your collage a unique look that stands out from others, don’t skip adding a watermark. Browse the page settings, tap “Identity Plate,” and write anything you want to show in the watermark.
The text may contain the name of your brand, something inspirational for the audience, or an emotional touch. The Identity Plate panel is also where wedding photographers typically add their studio branding before delivering a finished Lightroom collage to clients. For beginners, it is worth learning how to add a watermark in Lightroom before adding one to a finished collage.
Step 8: Save and Export Your Collage
Saving and exporting in Lightroom isn’t difficult, but getting the resolution right matters more than most beginners expect. In the Print Job panel, set “Print To” to JPEG File.
For the sharpest results:
Once your settings are correct:
1. Tap the “Print to File” button in the bottom-right corner of the screen.
2. Choose where to save the file on your device.
3. Find the exported JPEG in that folder once the export finishes.
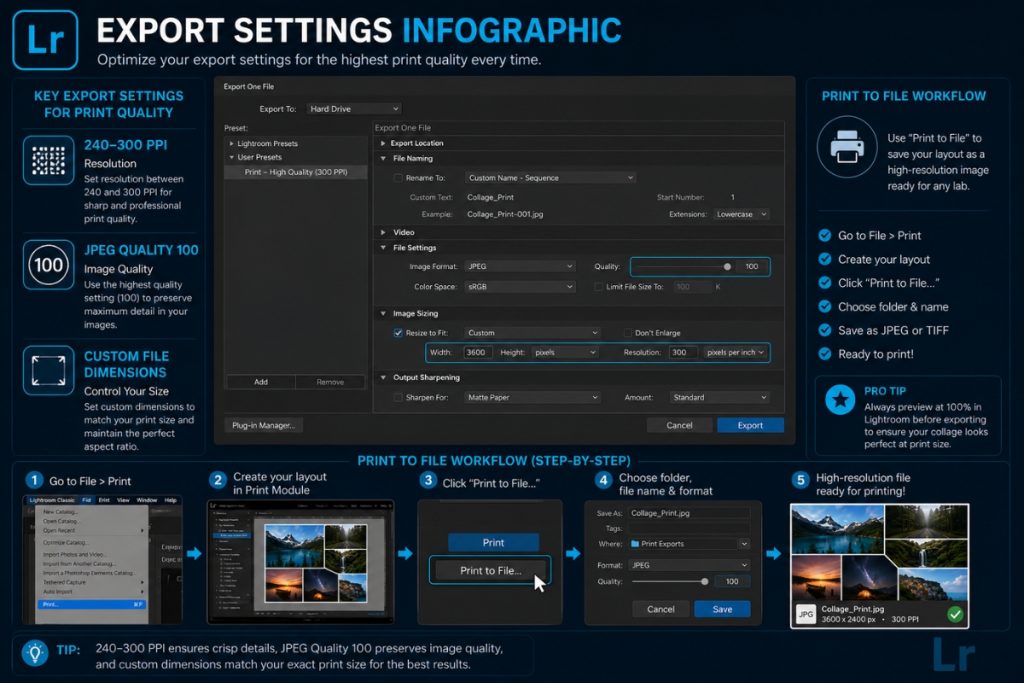
If you need a PDF instead of a JPEG, Lightroom’s Print module doesn’t have a direct PDF export option. Choose Printer instead of JPEG File under “Print To,” then select your operating system’s “Print to PDF” driver from the print dialog. The JPEG format is free to export, shareable on different social media platforms, and printable in hard copy.
Read Also: Best Lightroom Export Settings to save your time and efforts and get a quality image.
How Do You Build Custom Collage Templates in Lightroom?
If you want to create more collage templates in Lightroom, here are some basic steps to follow:
What Are the Best, Fastest Keyboard Shortcuts for a Lightroom Collage?
Using keyboard shortcuts is a great way to speed up making a Lightroom collage. You can save time and focus on creatively organizing your photos by using these shortcuts.
| Shortcut | Function | Purpose |
| G or Esc | Switch to Grid View | View all images together quickly. |
| Ctrl + Z | Undo | Remove the last action you did on image. |
| Ctrl + Y | Redo | Reapply the action that is removed accidentally or conditionally. |
| Ctrl + Shift + C | Copy Develop Settings | Copy settings from one image to other. |
| Ctrl + Shift + V | Paste Develop Settings | Paste the copied settings to the other image. |
| Ctrl + Alt + 6 | Go to Print Module | Browse to the section where you can print the image. |
Can You Make a Lightroom Collage on Mobile?
Not natively, at least not yet. As of this writing, Adobe’s own support team has confirmed that Lightroom Mobile and Lightroom CC don’t include a dedicated collage feature, since collage-building lives inside the Print Module, which is desktop-only. Adobe’s community forums show repeated feature requests for a mobile collage tool, so this may change in a future update.
In the meantime, if you edit on your phone, the most reliable workflow is to finish your edits in Lightroom Mobile on iOS or Android, sync them to Lightroom Classic on desktop through your Adobe cloud account, then build the actual collage in the Print Module there. Until Adobe adds a native collage maker to the mobile app, treat Lightroom Classic as your real Lightroom collage maker. If you need a collage on the go without a computer, a separate mobile collage app is currently your only option, since Lightroom itself won’t do it on a phone.
How Does a Lightroom Collage Add Value to Images?
Framing your images into an attractive layout to enhance shared memories gives significant value to a collage. Creating a collage in Adobe Lightroom has increased in demand in digital spaces in the following ways:
A single picture doesn’t tell as much of a story as a collage can, and that’s exactly why a Lightroom collage holds so much value.
How Does a Lightroom Collage Add Value for a Photographer?
If you are a photographer or want to become one, making one can showcase your skills. For instance, you may use a blend of colors and elements, features and presets, or batch editing altogether. Wedding photographers especially rely on this to show a full day’s story in a single frame instead of scattering it across dozens of separate photos.
This enhances the creativity in your work and opens more opportunities to attract potential clients.
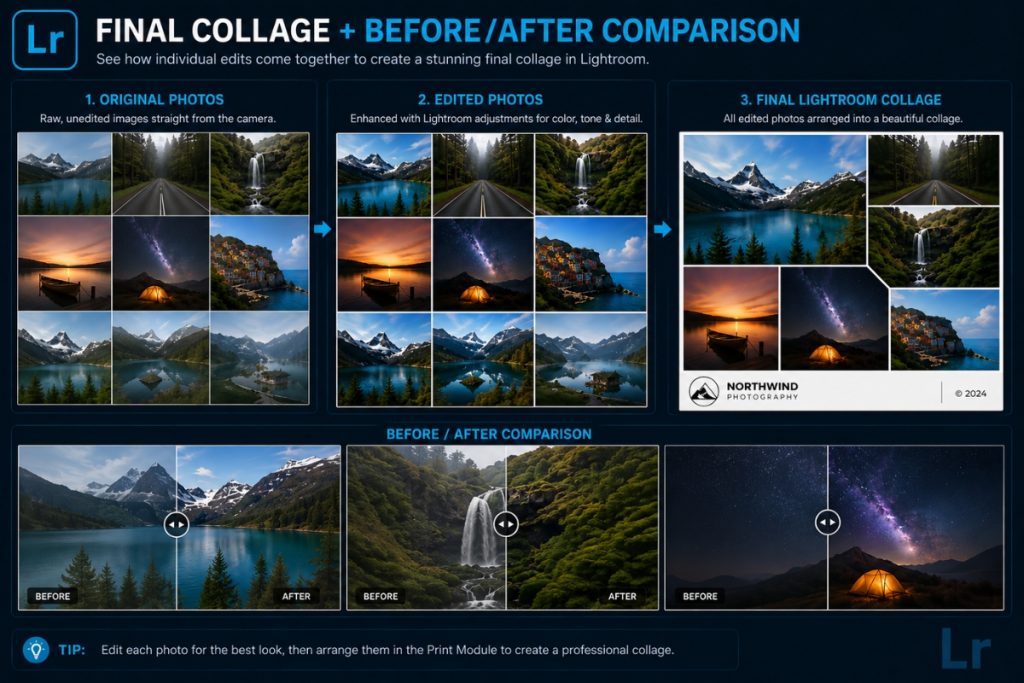
Photo Collage: A Source of Visual Value for Clients
Without creativity, editing feels incomplete, and a photo collage is a source of visual appeal for clients. Memories collected in a single layout with an emotional touch increase the attraction. It also has a strong effect on how viewers understand the art of your editing.
What Should You Consider When Making a Collage in Adobe Lightroom?
A professional and eye-catching collage is only possible if you learn to blend different aspects and elements. Whether you’re a beginner or an expert Lightroom user, don’t skip these considerations:
Frequently Asked Questions About Making a Lightroom Collage
Wrap it up!
Formatting images isn’t so difficult; however, enhancing creativity and making your collages attractive takes real practice. Once you save your own custom templates, Lightroom effectively becomes your own collage maker for future projects. Follow this tutorial once, save your templates, and your next Lightroom collage maker session takes minutes instead of hours. Work through these steps and experiment with different elements, and you’ll see how good your Lightroom collage can look.