Get Smooth Skin in Lightroom : Natural Look [Ultimate Guide] 2025
Blemishes and wrinkles are a great fear which alleviates attraction and visual appeal from images.
Look no further; the below article will help you to provide the ultimate methods for smooth skin in Lightroom.
Though Adobe Lightroom is famous for various tools like non-destructive editing, batch editing, and many more.
The smooth skin technique in Adobe Lightroom distinguishes it from any editing software and gives you a flawless image.
Why should we do Smooth Skin in Lightroom?
The major question that beginners ask is why Lightroom is suitable for smoothing skin.
Since Lightroom provides more advantages than other applications, the solution to this issue is simple.
Lightroom is responsible for maintaining a natural look as well as promoting precise editing for its advanced editing tools.
Here are a few reasons that help you to decide why you should choose Lightroom for smoothing the skin process.
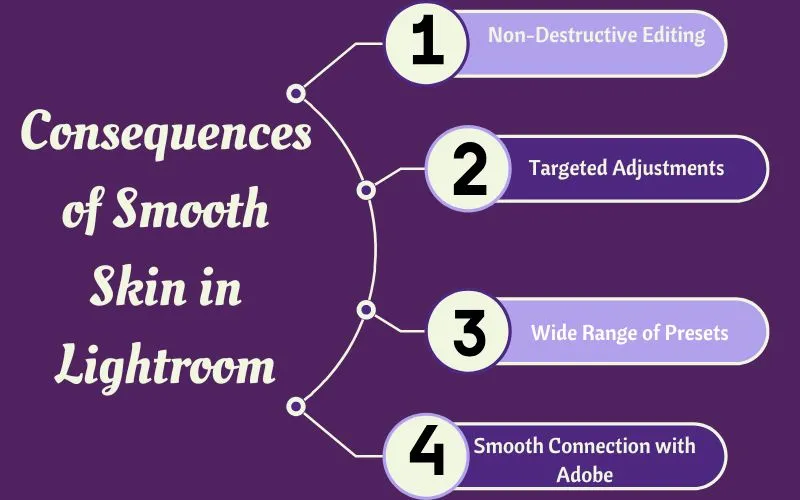
Lightroom doesn’t damage the integrity of the original image while providing professional results. That is why Photographers prefer using skin-smoothing techniques in Lightroom.
Here are a few Lightroom Hidden Features that you may not know and will help you to utilize the advanced editing tools.
Establish a Firm Basis for the Skin Smoothing Procedure
If you want to avoid any flaws while smoothing skin in Adobe Lightroom, there are some essential steps to follow.
By modifying the White balance, exposure, and straightening for optimal effects, these procedures aid in creating a solid base.
White Balance Adjustments for Accurate Skin Tones
Natural skin tones and accuracy in smoothing have an initial step which requires the adjustments of white balance. Here are simple steps to adjust white balance;
- Locate the Basic panel right side of interface after opening the Develop Module.
- Navigate your cursor to find the white balance. To preserve the picture’s natural colors, move the temperature and tint sliders.
- Slide the temperature to blue for cool images and move it to yellow for a warm-up image.
- The tint slider helps to adjust green or magenta colors in images for natural skin tones.
Use graduated filters and adjusting brushes for performing minor white balance tweaks. Experiencing different adjustments will avoid an unrealistic look while doing smooth skin in Lightroom.
Exposure Adjustments
The second step after adjusting the white balance in images is to adjust exposure. Let us check how to adjust exposure in Lightroom to obtain clear skin in images.
- Open the Develop Module after importing an image.
- Locate the Basic Panel as you do in adjusting the white balance and adjust the exposure. You can slide it by viewing whether your image needs to be darkened or brightened.
- As you move your slider to the right, your image will enhance exposure and reduce it by moving the slider to the left. Always check the image preview for better results.
- To distribute the tones well, guide your adjustments, and avoid highlights or shadows, navigate to Histogram.
Adjust other settings precisely, like contrast, shadows, and white, to refine the exposure and tone of the image.
Furthermore, you can make additional adjustments to enhance smooth skin editing in the image.
Cropping and Straightening in Lightroom
Besides white balance and exposure, cropping and straightening play an important role in smooth skin. The following are some steps you need to do to get the outcomes you desire:
- Navigate to the Detail Panel and press the Lightroom Keyboard Shortcut “R” to access cropping and straightening.
- Encompass the area of your image by cropping the edging corners.
- The cropping and straightening tool contains a straightening panel that helps adjust the rotation of the image.
- You may additionally drag the pointer outside the crop box to change the straightening. Wait until you see a curved double-headed arrow outside the box. Now tap to drag a horizontal or vertical line along the image.
Tap on the done button once you have set all the adjustments and observe how your image attains enhanced composition.
Eliminate Blemishes with Ultimate Spot Removal Tool
Blemishes indicate a mark on the skin. Though there are no drawbacks to having blemishes, they alleviate the clarity of your skin.
Therefore, removing blemishes from skin tones while editing images in Lightroom is essential.
The Spot Removal Tool makes it easy for users if they follow the given steps;
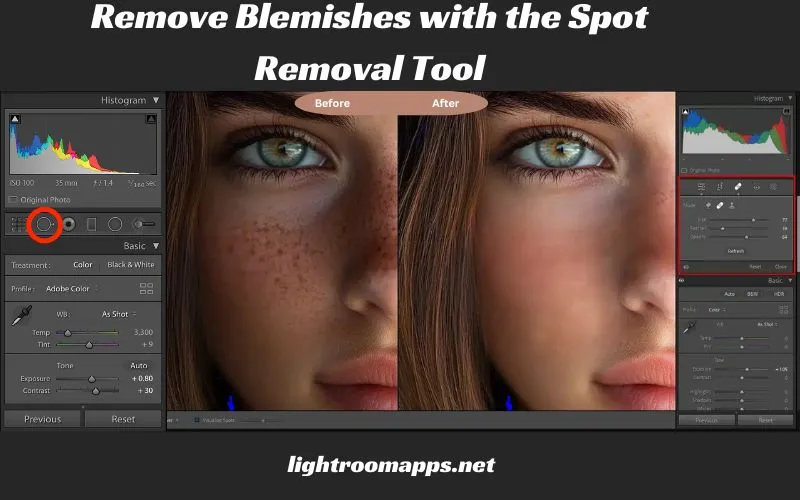
To get rid of every flaw, count how many there are and repeat the procedure. Once you have done editing, tap on the “Q” button to remove the spot removal tool or export the image as per your needs.
Smooth Skin in Lightroom – Utilize the Adjustment Brush
Using the right tools and features can meet your criteria for smooth and flawless skin in Lightroom by following simple steps.
To avoid any tedious tasks, users often need to find some appropriate techniques and adjustment brushes are one of them.
Let us check how adjustment brushes help to smooth skin by refining clarity, and sharpness sliders. To get the intended results, take the actions listed below:
Tweak Brush Tool and Feathering
Check other image settings and adjust other elements manually. If all editing is done, save your work and export it.
In case you don’t know how to export, have a look at Lightroom export settings.
Auto-Mask Option for Skin Smoothing Effect
Another method to get the smooth skin in Lightroom is to use the auto-mask option. The below steps will lead you to adjust the settings accordingly;
PRO Tip: Avoid excessive smoothness to maintain a natural, flawless look of your image. By moving the brush’s flow or density slider, you can change the opacity.
To excel smooth skin in Lightroom, always try different settings and have patience.
Focus on Clarity and Sharpness Sliders for PRO Look
The adjustment of clarity and sharpness sliders enhance the smooth skin effect in your images. Let us check what are the best practices to adjust these sliders.
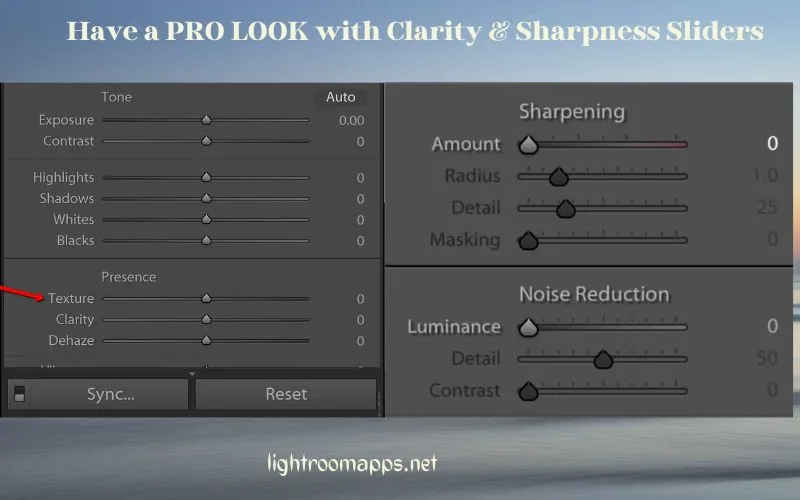
If you want to gain the right balance, experiment with different adjustments of sliders to get your desired results.
The refinement of smooth skin in Lightroom depends on the clarity and sharpness of the sliders.
Therefore, they ensure smooth skin and enhance a natural look while editing. If you don’t want to buy a subscription for advanced editing tools, Lightroom MOD APK is for you.
Role of Adjustment Sliders in the Skin Smoothing Process
Interlinking the adjustment sliders with the skin smoothing process can give you better results.
Single sliders decline smoothness, whereas adjusting sliders with tools enhances natural skin tone. Brush Tool is a common tool that people use for smooth skin in Lightroom.
However, to remove small imperfections from your image, interlinking the brush with a clone tool can give exceptional results.
It is a good approach to smooth only the face and leave the eyes, lips, and lashes as sharp as they are. It gives a natural attractive outlook of the image you have edited.
Using the mask settings in MacOS (cmd + O) and Windows (alt + O) estimates brush effects on your images. Once you apply it, you will see a red highlighted area to see the effects.
Final Tips to Maintain a Natural Skin Appearance
To get a glossy, natural, and perfect skin appearance, there are some final touches that you need to maintain.
Have a look over the tips which not only saves your images from over smoothing but also gives a flawless look.
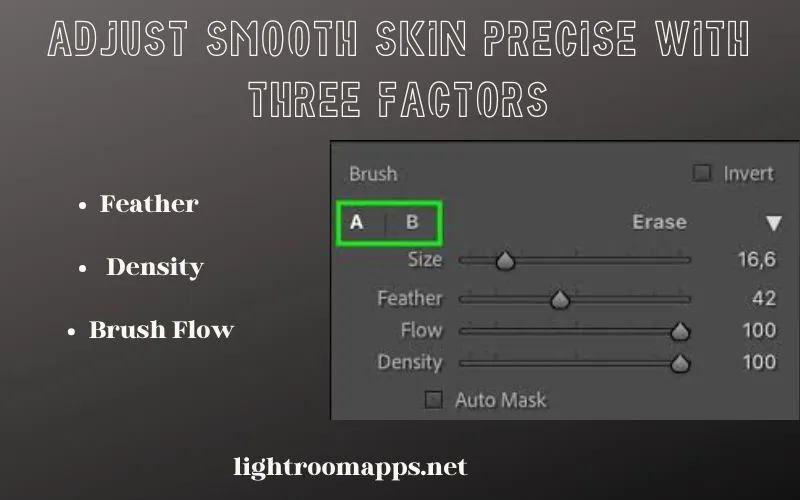
Things to Adjust for Smooth Skin Precise Editing
Mostly, individuals face a problem managing fine control over brushes while smoothing skin in Lightroom. Here are a few tips that’ll assist you maintain solid control over accurate editing.
Feather:
Feather covers the aspect of soft brush and hard brush. If you prefer using a soft brush while editing, you will have smooth editing.
However, hard brushes reduce the preciseness in editing around the brush edges alleviating smoothness.
Density:
To gain more effectiveness of brushes, lower density will provide you with tremendous results. A 50% density means a 50% opacity you have with your brush.
Brush Flow:
Setting the brush flow around +100 gives the most effective editing. One stroke of brush will apply all the adjustments with this setting.
The Brush flow setting controls the speed of the brush at which you are applying adjustments. A lower flow takes more time and passes to apply the effect entirely.
Capture Images with a Smooth Skin Camera
Another procedure that you can perform to enhance skin smoothing while capturing images is to use a smooth skin camera.
To remove acne or scars on the images, you need to adjust the camera angle. A good skin camera involves an 85mm f/1.4 (or f/1.8) prime lens or a 90mm macro.
Lightening is the most important factor to consider to capturing smooth images with a camera. Slit light is helpful in removing impurities by putting a shadow on one side of the face.
You may also utilize any of the above methods to make smooth skin. If your captured images get blurred with a camera, you can fix blurry images in Lightroom.
AI-Powered People Mask for Natural Skin Smooth
In 2025, for natural skin smoothing in Adobe Lightroom, your go-to-tool without affecting any part of your face is the AI-Driven People Masking.
Since AI automatically detects the facial parts like eyes, adjusting shadows and whites within AI masks provide a more vibrant look.
The manual selections for the face isn’t so fast as these AI masks are, therefore, this approach provides a faster editing way. The naming masks are the most popular way to organize images and is particularly valuable method for batch editing.
Frequently Asked Questions about Smoothing Skin in Adobe Lightroom
Finalizing Thoughts
I have covered the best approaches to smooth skin in Lightroom. The details panel’s skin softness slider modifies your image’s smoothness. Editing depends on creativity, and creativity is only achieved if you focus on flawless and natural images.
Lightroom offers a number of sophisticated editing features to improve your photos’ aesthetic appeal. However, you should always maintain a natural look and avoid over-smoothness factors.