Rotate Images in Lightroom using Four Proven & Easy Ways [2025]
Do your images face inconsistent rotation on import? Nowadays, users face a lot of issues with image flipping, bugs where the cropped frame can’t be moved fully to the image edges.
Such cases badly affect the quality of the image editing, hinder the process, and cause frustration while handling large batches of image editing.
Therefore, it’s the best way to study and find out the ultimate ways that are proven and reliable to rotate images in Lightroom.
To fasten your editing process without affecting the quality of your work, I want to discuss how to rotate left or right in Lightroom. Besides, you will also learn manual editing and choose the way that’s best for you.
Ultimate Reasons to Rotate Images in Lightroom
Editing without understanding why image rotation matters in Lightroom can limit results. Mastering Lightroom’s crop and rotation options requires firsthand experience with the challenges of improper rotation.
Various factors contribute to image rotation, perhaps camera settings or physical factors. Using Lightroom rotation over images can help you add a special touch to the image editing process.
Let us elaborate on the major reasons that result in rotating images while editing in Lightroom.
Tilted Elements – Imagine capturing a landscape where the horizon tilts slightly to one side. Even a minor tilt makes the scene look unbalanced.
Similarly, in portrait photography, a slight camera angle can make the subject appear off-center.
Rotating in Lightroom restores proper alignment, ensuring the photo feels natural and professional.
Horizontal or Vertical Photo Reflection – If you want to create the final image as an ultimate copy of the original one, you immediately need a mirror effect on the image.
This effect shows if the left or right sides of the image are switched. Here, image rotation will help to create a horizontal or vertical photo reflection.
Unconventional Images – Taking images from unusual angles results in distorted perspectives or tilted horizons.
Image rotation in Lightroom corrects alignment, smoother cropping, and retouching such images taken from unusual angles.
Many photographers use angles to create a new perspective wan artistic vision in the images.
After capturing an image with an unconventional angle to achieve a specific perspective effect, rotation can fine-tune that angle.
Note: Check the various ways to blur images background in Lightroom!
Proven Ways to Rotate Images in Lightroom
Image rotation in Lightroom has various ways, it depends on how artistic vision you want to add to your images. Every tool that Lightroom provides has certain dramatic rotations to make adjustments in your images.
Let us explore the ways to rotate images in Lightroom creating a dramatic effect as you want in the final image.
1. Image Rotation by 90 Degrees
The first and basic method to rotate images in Lightroom is the rotation by 90 degrees. You can rotate a photo by 90 degrees by following these simple instructions.
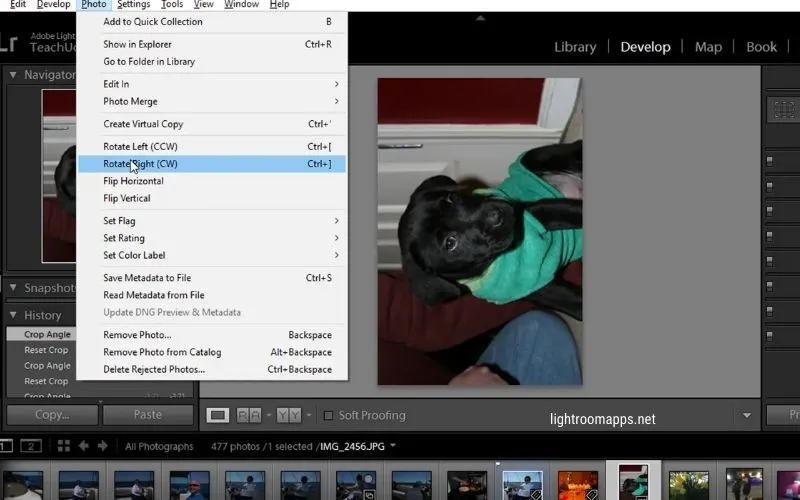
- Open Lightroom on your device and navigate to the Develop Tab next to the Library, which will open the Develop module.
- The top bar menu will show you the “Photo” icon. Tap on this icon, and you will see a dropdown menu.
- The dropdown menu will show you the options of Rotate left for counterclockwise and Rotate right for clockwise. Tapping on any button will rotate your image clockwise or counterclockwise from the centre point of the image.
If you don’t comprehend the previous steps, you can alternatively utilize these other options given below.
Use Keyboard Shortcuts
You can use the keyboard shortcuts to rotate images in Lightroom, whether you’re using a Mac or a PC.
- For Mac: Command+< and Command+>
- For PC: CTRL+< and CTRL+>
Choose Alternative
Depending on your objectives, you can select from a variety of alternate methods available in Lightroom for rotating photographs. Try them and check out the results, stick with the method that gives the best output.
Use the Library Module
The Library Module also provides image rotation options, but it provides fewer degree increments as compared to the Develop module.
The Library Module also gives the options to rotate multiple images, making it easily to handle multiple photos at once. Download lightroom HDR presets for free and enjoy editing.
2. Image Rotation by Less Than 90 Degrees
To rotate the images by less than 90 degrees, you have to opt Develop Module and find straight and Crop tool in Lightroom.
Image Flip to its Mirror Image
If you want to flip the image to its mirror image, here is a simple step-by-step guide that you can follow.
3. Image Straightening in Lightroom
The above rotations will provide tremendous results to the individuals who are skilled at rotating images. However, for beginners, I suggest the proper use of refined tools for image straightening in Lightroom.
You can use the crop tool within the Develop module to perfectly straight the image in Lightroom. Let us check out the basic steps to straight the images in Lightroom.
- For generating a crop border across your image, use the Crop Overlay Tool.
- Reposition the image within the crop space that you have created by dragging.
- Now you can rotate the image so that its elements are straightened up within the crop boundaries.
- Once you rotate the image, Lightroom will provide you with a fine grid to further fine-tune the alignment.
Auto Straight Function
Lightroom also provides the Auto Straight Function right after the crop tool to straight the images containing a horizon.
When you apply this function to your images, Lightroom will find the horizontal line within the image and adjust it accordingly.
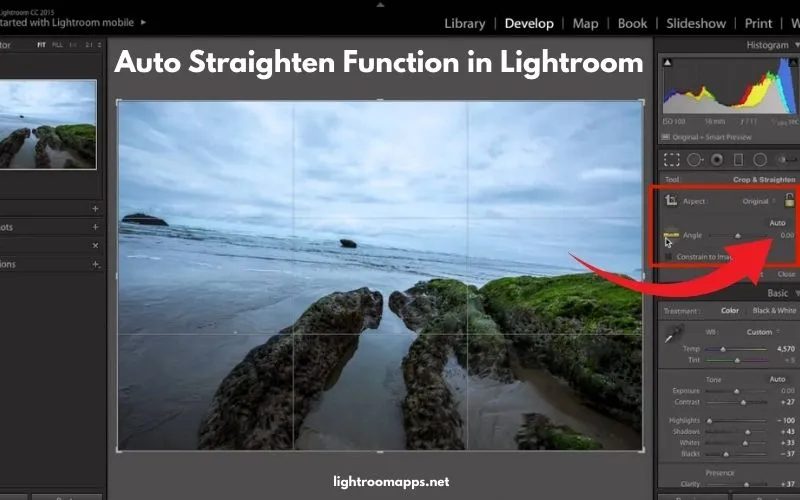
The only thing to keep in mind while using this option is to define the horizontal line properly. Otherwise, you will not find the desired results within the image. I also have a better option that may suit your needs.
Note: If you are an iOS user, download lightroom for iOS!
Precise Straight Option
Lightroom provides the Precise Straight Function that serves the same goal as adjusting the horizon. This option is available under the Crop and Straight section. You can use it by following the steps given below:
Bonus Tip – If you want any additional adjustments, the right panel contains the slider bar. Slider can help you reach your goal as you require.
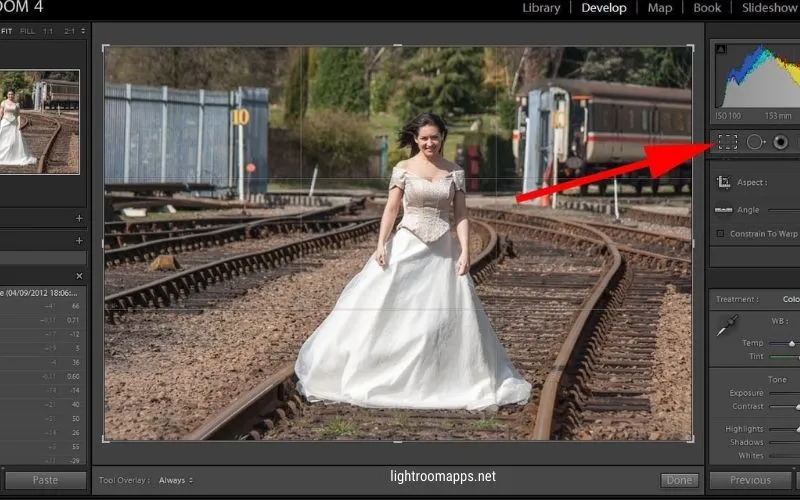
Rotate Icon or Angle Slider Option
Lightroom also provides the rotate icon or angle slider options for image rotation within the crop box. The angle tool can help you to drag images horizontally or vertically to rotate the image.
The angle slider precisely rotates the image, straightens the image, drags the outside corners within the crop box, and rotates the image freely.
Enable the Constrain To Warp option (previously known as “Constrain to Crop”) to automatically adjust the crop frame. It stays within the visible photo area and prevents any empty or transparent spaces around the edges.
This ensures the final cropped image doesn’t contain unwanted white or transparent borders caused by the rotation and warping effects.
4. Manual Input Image Rotation
The least but last option to rotate an image is to rotate manually by inputting the degree of rotation. If you use the positive numbers, you will see a clockwise image rotation.
However, for negative numbers, there will be an anticlockwise image rotation. This option will have more control over the image.
Quick PRO Tip
Using the Crop Overlay tool in the Develop module (press D to open it) is the best choice for perfect image rotation. If you want to undo your changes, click the Reset button.
Once you’re happy with the alignment and straightening, apply the changes by clicking the Crop Overlay tool again.
With a little practice, you’ll quickly master rotating photos in Lightroom with ease. Check out the older versions of Lightroom.
Frequently Asked Questions – FAQs
Conclusion
Rotation in Lightroom not only fixes technical issues like tilted horizons but also gives you creative control over perspective, reflections, and alignment . Of course, if you don’t know how to use this skill, it will take time to get perfection.
The above guide is a way to take a start about how to rotate images in Lightroom using the refined tools.


![6 Proven Ways to Fix Blurry Photos in Lightroom Easily [2025]](https://lightroomapps.net/wp-content/uploads/2025/01/Fix-Blurry-Photos-768x399.webp)
